

So the first of this series is a sculpt that I created of Cleveland Indians shortstop Francisco Lindor. If there's one thing I love as much as game development, it's baseball. I picked Lindor not only because he's one of my favorite players, but also because he has unique facial features.

Starting things off... this doesn't look very much like him. I started off with a very basic human mesh in Maya with plans to tweak the facial features in ZBrush. I have used this base on multiple projects since I like the way I set up the geometry and it works as a starting point for lots of different characters. The bust is quite low poly, weighing in at 3216 tris.

The UV mapping on this is a little different from my usual approach. I wanted to make sure that the mouth had plenty of room for detail (especially because I planned to sculpt in the teeth). So I cut the mouth area into its own shell. Normally I would try to only have seams in less visible areas, but since I planned to do all of the texturing in Substance Painter, I knew I'd be able to effectively hide those seams. At this point the eyes were actually part of the head mesh, but in order to expand the detail, I eventually cut the sockets open and created new meshes.

After modeling the initial base mesh, I took it into ZBrush for some refinement. As you can see, I made major structural changes to the face. Francisco Lindor has a very unique lip curl when he smiles, so I wanted to make sure to capture that. Since this sculpt isn't intended for animation or game usage, I can go all out in sculpting the facial expression.

After a few hours of sculpting in ZBrush (about 6 and a half, in fact), the face is starting to take shape. Even though ZBrush has tons of interesting brushes, I do almost all of my work just using the Standard, Clay Buildup, Dam Standard, and Move Topological. For the hair, I switched my brush style to "spray" and used one of the busier looking alphas. Since I gave a lot of space to the hair on my UV map, I was able to get some good detail in that portion of the sculpt.

Next comes the surface details. For this, I experimented with the layers function in ZBrush (possibly the first time I've ever touched it!). It was super handy in letting me keep all of the changes on a separate area that could be hidden or adjusted. As you can see, I added in the skin pores and lip cracks at a very high intensity. With layers, I could then tweak that visibility to get it down to a more subtle and realistic rate.

This is usually the tedious part where I have to bake out maps and retopologize the model to get it game-ready. Again, since this isn't going to be animated, I get to skip this part and continue working with the high poly model. For comparison though, I did export out the low res version to compare it with the base. Both models pictured above are using that same 3216 triangles, but as you can see the shape is now much different.

Now comes my favorite part - texturing the mesh! From here I bring my model over into Substance Painter to paint on all of that texture detail. I start things off by creating a fill layer across the whole model that will be my base skin layer. (I can't find the exact link to the one I use, but it should be linked in the official Substance tutorials if you're interested)

After the initial base layer is down, it's time to start adding some variation. I paint in the temperatures of the face. Generally the cheeks, nose, chin, lips, and throat have a warm reddish hue. Cold parts like under the eyes, under the nose, and under the lips get blue. Here's a good reference from Martin Guldaek that might help. After painting in those colors, it's important to blend them. I make another new layer with a slightly lighter skin color and start painting all over the face with a scratch alpha. This is referred to as "noodling." Once I'm satisfied, I fiddle with the opacity sliders until I get something that looks nice and blended.

Once the skin starts coming together, I go to work on the mouth. I make sure to paint the gums before the teeth so I can be a little bit messier with them. The teeth are nearly a pure white with a super low roughness to get that shininess to them. Finding the right color for the lips can be a bit of a challenge, especially with a male character who is not wearing lipstick. You want something that stands out from the skin, but not too much that it looks unnatural. I used a pressure-sensitive opacity and blended a lot of colors together to get that nice salmon hue.

Now it's time to fill in the hair. Like the skin, I first put down a very basic fill layer. Frankie has pretty dark hair, but I used a slightly desaturated brown just so all of the details didn't get too washed out by the blackness. After that, I created an alpha of the part of the mesh colored with hair and used that as a mask. On my new mask I used a repeating curly hair texture and set it to my height map. This adds in a lot more fine details without having to physically go in and paint them by hand.

Once I toss the hat on and give the uniform some color, he actually starts to resemble the ball player we know and love. This part was a bit tricky to paint as there wasn't a ton of geometry detail down in his shoulders. Had this been a full character I wouldn't have ran into this challenge, but since I put most of the detail in his face it was a bit hard getting sharp lines on the shirt divisions.

It was a tough call deciding which uniform colors to go with. I'm not terribly fond of the block C logo, but I like that off-grey color of the away uniforms so I went with that 3rd color scheme.
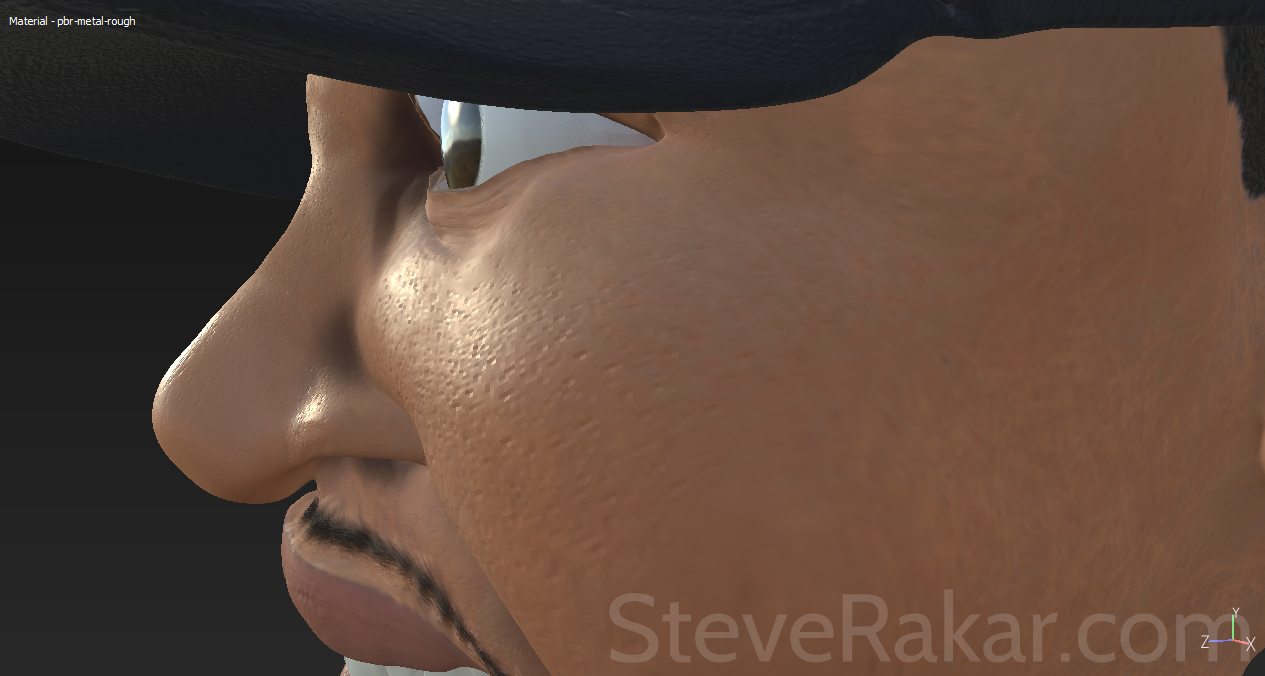
Next I went back and worked some more detail into the skin. Something really important in PBR texturing (physically based rendering, not the cheap beer) is the roughness map. Painting this gloss texture in allows you to see all of the really fine details when the light passes over them. I made sure to plug in my roughness layer with my skin pores so that you get the really nice fine detail when you move the light around.


At this point, it's basically just putting in the finishing touches. After painting Lindor's facial hair, I went in and gave him eyebrows. (Amazing how alien a character looks without them!) I also painted some darkness onto the eye lash area, but I was careful not to go overboard and make him wear eyeliner. Lastly I pushed some of the shadow areas around the eyelids and in the nose crevices. I generally try to avoid painting in too many shadows unless I'm specifically going for a hand-painted look, but a little bit of darkness in these indented areas goes a long way.

Added the logo to the cap, modeled in Frankie's signature necklace, and added in a few more clothing seams. At this point, I decide to call him done. I could probably still tweak this thing for hours and hours, but it's important to know when to call something done. I wanted this model to have a quicker turnaround, so at this point I export out all of my textures and finish up.

After exporting everything out of Painter, I bring the model into Marmoset Toolbag for some fancy rendering. Toolbag has a lot of excellent lighting presets to view your model in different environments. I would definitely recommend it as a good way to showcase your models without dealing with lengthy light setups and rendering times.

It also has a lot of fun post processing effects that I like to play around with. It can be useful to view your model in different lighting, but most of all it's just plain fun to check them out.
All in all, I spent about 18 hours on this model. I didn't set a strict timer like I do with my freelance work, but I wrote down estimates at the end of each day. Here is a basic breakdown if you're interested:
- Maya base modeling: 1.5 Hours
- ZBrush sculpting: 6.5 Hours
- Substance Painter texturing: 9.5 Hours
- Toolbag/Photoshop Rendering: 1 Hour
I know I wanted to keep things short and offer more blog posts, but I think this in-depth description of my process is useful as well. I plan to do something similar for the next project I post about, and I might even make a video. But speaking of videos, I'll leave you with a short turntable of this model. Thanks for reading my post. I hope it was informative and you enjoyed. Until next time... Adios!
No comments:
Post a Comment